!!📢說明!!
- 🚫 1,請勿轉載本文相關內容到中國大陸任何媒體社交平臺. .
- 📢 2,所有實驗均運行與Arch Linux系統之上,並非Windows,但和Windows步驟是一樣的. .
- 📢 3,實驗中使用Vmware-Workstation虛擬化軟體,軟件來源自互聯網. .
- 📢 3,實驗中用到的所有軟體,均會採用最新版本,遵循Arch理念. .
🔧實驗準備.
- 🔧 準備好 基本實驗環境搭建..
實驗環境
👀 實驗環境.
| 設備名稱 | 主機名稱 | 接口對應關係 | IPV4地址 | 虛擬網卡網段 |
|---|---|---|---|---|
| 虛擬機1 | controller | eth0->vmnet21 eth1->vmnet25 | 192.168.21.21 10.10.21.21 | vmnet21: 192.168.21.0/24 |
| 虛擬機2 | compute | eth0->vmnet21 eth1->vmnet25 | 192.168.21.25 10.10.21.25 | vmnet25: 10.10.21.25.0/24 |
之後所有都有這張表格,所以請記住,你在哪,你是誰,你在幹什麼.
RUN
Heat 编排-创建用户[1 分]
编写 Heat 模板 create_user.yaml,创建名为heat-user的用户。
使用自己搭建的OpenStack私有云平台,使用heat编写摸板(heat_template_version:2016-04-08)
创建名为”chinaskills”的domain,在此domain下创建名为beijing_group的 租 户,
在此租户下创建名为cloud的用户,将此文件命名及保存在/root/user_create.yml,
完成后提交 controller 点的用户名、密码和 IP 地址到答题框。
(竞赛系统会执行 yaml 文件,请确保执行的环境)
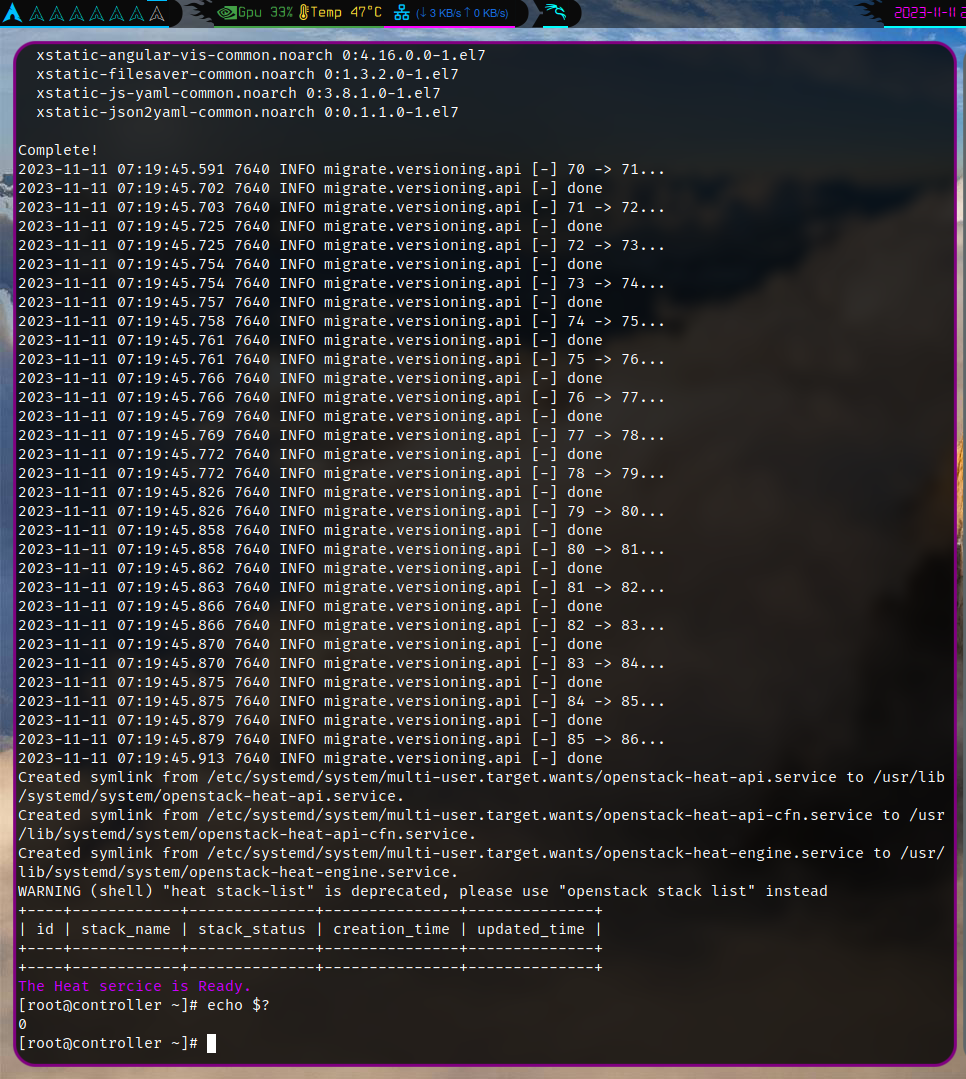
controller主機執行.
iaas-install-heat.sh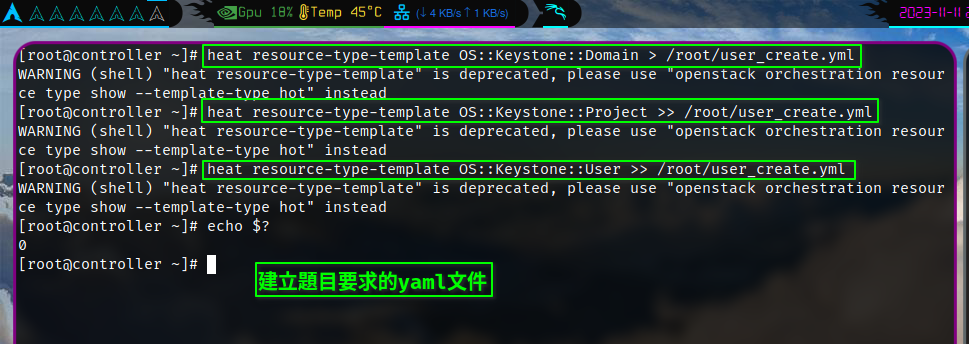
heat resource-type-template OS::Keystone::Domain > /root/user_create.yml
heat resource-type-template OS::Keystone::Project >> /root/user_create.yml
heat resource-type-template OS::Keystone::User >> /root/user_create.yml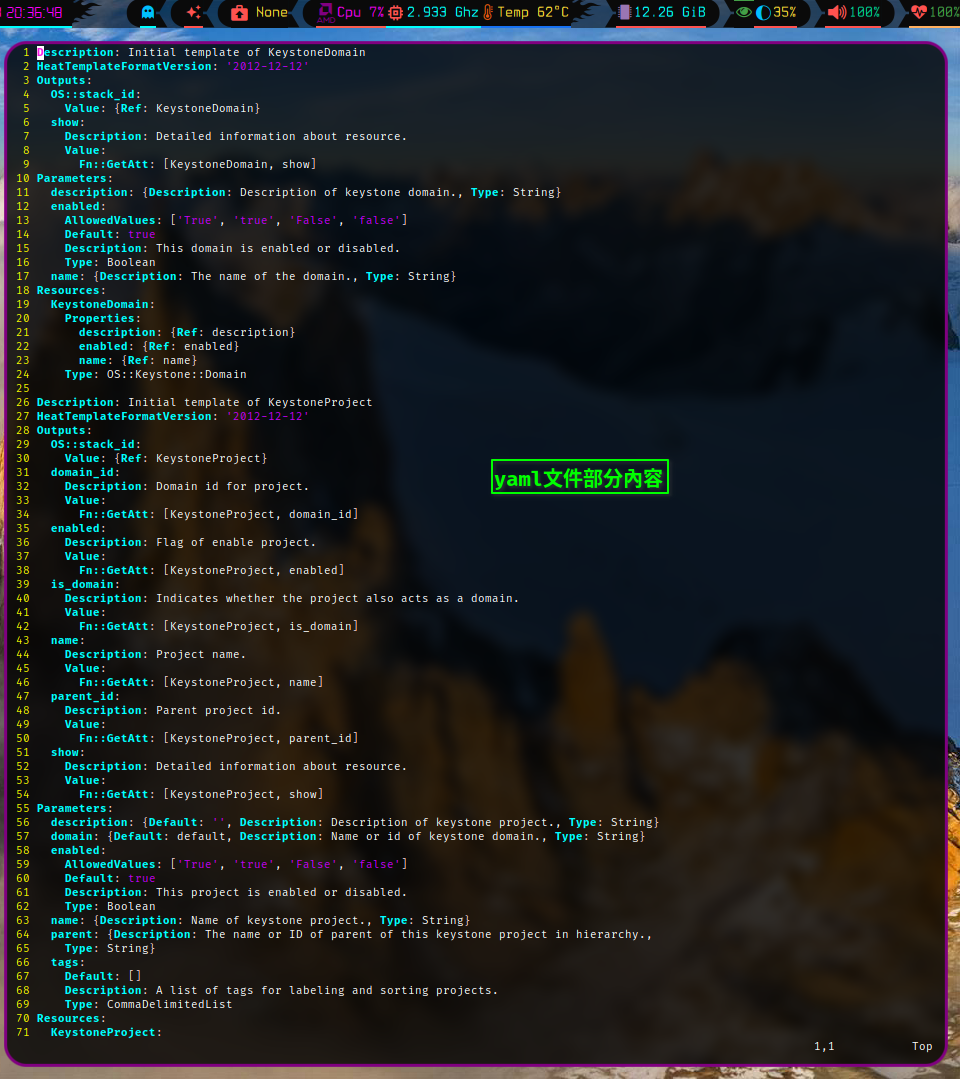
完整的yaml文件
Description: Initial template of KeystoneDomain
HeatTemplateFormatVersion: '2012-12-12'
Outputs:
  OS::stack_id:
    Value: {Ref: KeystoneDomain}
  show:
    Description: Detailed information about resource.
    Value:
      Fn::GetAtt: [KeystoneDomain, show]
Parameters:
  description: {Description: Description of keystone domain., Type: String}
  enabled:
    AllowedValues: ['True', 'true', 'False', 'false']
    Default: true
    Description: This domain is enabled or disabled.
    Type: Boolean
  name: {Description: The name of the domain., Type: String}
Resources:
  KeystoneDomain:
    Properties:
      description: {Ref: description}
      enabled: {Ref: enabled}
      name: {Ref: name}
    Type: OS::Keystone::Domain

Description: Initial template of KeystoneProject
HeatTemplateFormatVersion: '2012-12-12'
Outputs:
  OS::stack_id:
    Value: {Ref: KeystoneProject}
  domain_id:
    Description: Domain id for project.
    Value:
      Fn::GetAtt: [KeystoneProject, domain_id]
  enabled:
    Description: Flag of enable project.
    Value:
      Fn::GetAtt: [KeystoneProject, enabled]
  is_domain:
    Description: Indicates whether the project also acts as a domain.
    Value:
      Fn::GetAtt: [KeystoneProject, is_domain]
  name:
    Description: Project name.
    Value:
      Fn::GetAtt: [KeystoneProject, name]
  parent_id:
    Description: Parent project id.
    Value:
      Fn::GetAtt: [KeystoneProject, parent_id]
  show:
    Description: Detailed information about resource.
    Value:
      Fn::GetAtt: [KeystoneProject, show]
Parameters:
  description: {Default: '', Description: Description of keystone project., Type: String}
  domain: {Default: default, Description: Name or id of keystone domain., Type: String}
  enabled:
    AllowedValues: ['True', 'true', 'False', 'false']
    Default: true
    Description: This project is enabled or disabled.
    Type: Boolean
  name: {Description: Name of keystone project., Type: String}
  parent: {Description: The name or ID of parent of this keystone project in hierarchy.,
    Type: String}
  tags:
    Default: []
    Description: A list of tags for labeling and sorting projects.
    Type: CommaDelimitedList
Resources:
  KeystoneProject:
    Properties:
      description: {Ref: description}
      domain: {Ref: domain}
      enabled: {Ref: enabled}
      name: {Ref: name}
      parent: {Ref: parent}
      tags:
        Fn::Split:
        - ','
        - {Ref: tags}
    Type: OS::Keystone::Project

Description: Initial template of KeystoneUser
HeatTemplateFormatVersion: '2012-12-12'
Outputs:
  OS::stack_id:
    Value: {Ref: KeystoneUser}
  default_project_id:
    Description: Default project id for user.
    Value:
      Fn::GetAtt: [KeystoneUser, default_project_id]
  domain_id:
    Description: Domain id for user.
    Value:
      Fn::GetAtt: [KeystoneUser, domain_id]
  enabled:
    Description: Flag of enable user.
    Value:
      Fn::GetAtt: [KeystoneUser, enabled]
  name:
    Description: User name.
    Value:
      Fn::GetAtt: [KeystoneUser, name]
  password_expires_at:
    Description: Show user password expiration time.
    Value:
      Fn::GetAtt: [KeystoneUser, password_expires_at]
  show:
    Description: Detailed information about resource.
    Value:
      Fn::GetAtt: [KeystoneUser, show]
Parameters:
  default_project: {Description: Name or ID of default project of keystone user.,
    Type: String}
  description: {Default: '', Description: Description of keystone user., Type: String}
  domain: {Default: default, Description: Name or ID of keystone domain., Type: String}
  email: {Description: Email address of keystone user., Type: String}
  enabled:
    AllowedValues: ['True', 'true', 'False', 'false']
    Default: true
    Description: Keystone user is enabled or disabled.
    Type: Boolean
  groups: {Description: Keystone user groups., Type: CommaDelimitedList}
  name: {Description: Name of keystone user., Type: String}
  password: {Description: Password of keystone user., Type: String}
  roles: {Description: List of role assignments., Type: CommaDelimitedList}
Resources:
  KeystoneUser:
    Properties:
      default_project: {Ref: default_project}
      description: {Ref: description}
      domain: {Ref: domain}
      email: {Ref: email}
      enabled: {Ref: enabled}
      groups:
        Fn::Split:
        - ','
        - {Ref: groups}
      name: {Ref: name}
      password: {Ref: password}
      roles:
        Fn::Split:
        - ','
        - {Ref: roles}
    Type: OS::Keystone::User
KVM 优化[1 分]
在 OpenStack 平台上修改相关配置文件,启用-device virtio-net-pci in kvm。
在自行搭建的 OpenStack 私有云平台或赛项提供的 all-in-one 平台上,修改相关配置
文件,启用-device virtio-net-pci in kvm,配置完成后提交控制节点的用户名、密码和
IP 地址到答题框。
controller主機執行.
vim /etc/nova/nova.confNFS 对接 Glance 后端存储[1 分]
使用 OpenStack 私有云平台,创建一台云主机,安装 NFS 服务,然后对接 Glance 后端存储。
使用赛项提供的 OpenStack 私有云平台,创建一台云主机(镜像使用 CentOS7.9,
flavor 使用带临时磁盘 50G 的),配置该主机为 nfs 的 server 端,将该云主机中的 50G
磁盘通过/mnt/test 目录进行共享(目录不存在可自行创建)。然后配置 controller 节点
为 nfs 的 client 端,要求将/mnt/test 目录作为 glance 后端存储的挂载目录。配置完成
后提交 controller 控制节点的用户名、密码和 IP 地址到答题框。
Redis 主从[1 分]
使用赛项提供的OpenStack私有云平台,创建两台云主机,配置为redis的主从架构。
使用赛项提供的 OpenStack 私有云平台,申请两台 CentOS7.9 系统的云主机,使用提
供的 http 源,在两个节点安装 redis 服务并启动,配置 redis 的访问需要密码,密码设置
为 123456。然后将这两个 redis 节点配置为 redis 的主从架构。配置完成后提交 redis 主
节点的用户名、密码和 IP 地址到答题框
Linux 系统调优-脏数据回写[1 分]
修改系统配置文件,要求将回写磁盘的时间临时调整为 60 秒。
Linux 系统内存中会存在脏数据,一般系统默认脏数据 30 秒后会回写磁盘,修改系统
配置文件,要求将回写磁盘的时间临时调整为 60 秒。完成后提交 controller 节点的用户
名、密码和 IP 地址到答题框。
Glance 调优[1 分]
在 OpenStack 平台中,修改相关配置文件,将子进程数量相应的配置修改成 2。
在 OpenStack 平台中, glance-api 处理请求的子进程数量默认是 0,只有一个主进
程,请修改相关配置文件,将子进程数量相应的配置修改成 2,这样的话有一个主进程加 2
个子进程来并发处理请求。完成后提交控制节点的用户名、密码和 IP 地址到答题框。
Ceph 部署[1 分]
使用提供的 ceph.tar.gz 软件包,安装 ceph 服务并完成初始化操作。
使用提供的 ceph-14.2.22.tar.gz 软件包,在 OpenStack 平台上创建三台 CentOS7.9
系统的云主机,使用这三个节点安装 ceph 服务并完成初始化操作,第一个节点为 mon/osd
节点,第二、三个节点为 osd 节点,部署完 ceph 后,创建 vms、 images、 volumes 三个
pool。完成后提交第一个节点的用户名、密码和 IP 地址到答题框。
Glance 对接 Ceph 存储[1 分]
修改 OpenStack 平台中 Glance 服务的配置文件,将 Glance 后端存储改为 Ceph 存储。
在自己搭建的 OpenStack 平台中修改 glance 服务的相关配置文件,将 glance 后端存
储改为 ceph 存储。也就是所以的镜像会上传至 ceph 的 images pool 中。通过命令使用
cirros-0.3.4-x86_64-disk.img 镜像文件上传至云平台中,镜像命名为 cirros。完成后提
交 controller 节点的用户名、密码和 IP 地址到答题框。
Cinder 对接 Ceph 存储[1 分]
修改 OpenStack 平台中 cinder 服务的配置文件,将 cinder 后端存储改为 Ceph 存储。
修改 OpenStack 平台中 cinder 服务的相关配置文件,将 cinder 后端存储改为 ceph 存
储。使创建的 cinder 块存储卷在 ceph 的 volumes pool 中。 配置完成后, 在 OpenStack 平
台中使用创建卷 cinder-volume1,大小为 1G。完成后提交 controller 节点的用户名、密
码和 IP 地址到答题框。
Nova 对接 Ceph 存储[1 分]
修改 OpenStack 平台中 Nova 服务的配置文件,将 Nova 后端存储改为 Ceph 存储。
修改 OpenStack 平台中 nova 服务的相关配置文件,将 nova 后端存储改为 ceph 存储。
使 nova 所创建的虚拟机都存储在 ceph 的 vms pool 中。配置完成后在 OpenStack 平台中使
用命令创建云主机 server1。完成后提交 controller 节点的用户名、密码和 IP 地址到答
题框。
私有云平台优化:系统网络优化[1 分]
使用自行创建的 OpenStack 云计算平台,配置控制节点的网络缓存,使得每个 UDP
连接(发送、接受)保证能有最小 358 KiB 最大 460 KiB 的 buffer,重启后仍然生效。
配置完成后提交 controller 控制节点的用户名、密码和 IP 地址到答题框。