XXX职业技术学院,校园网破解!
这是我听过最温暖的一句话:
- 💖 这世上,唯有学习不会辜负自己.
!!前言!!
- 🚫 一把菜刀既能用来做饭,也能用来砍人.
- 🚫 只提供具体破解方法.
- 🚫 不提供任何软件.
- 💖 但是所有的配置,以及软件源代码,均会开源.
!!或许你该选择退出了!!
- 💖 如果你能看懂这张图,且妩媚一笑,那么你该是有多么的孤独.
- 💖 如果你已经不在往下看,那么你一定很强大,你有着属于自己的本领.
- 💖 有些东西,终究是你的,谁也拿不走.
- 💖 加油!!!陌生人.
👀你即将看到最振奋人心的技术👀.
- 💪 各种高级的代理技术.
- 💪 各种高级的链式代理技术.
- 💪 SDWAN技术.
- 💪 OpenVPN技术.
准备.
- 🔧装有任意Linux发行版的X86-64架构计算机1台.
- 🔧编译好的Xray可执行文件.
- 🔧细心,用心,耐心,和孤独.
- 🔧以及你最熟练的某个编辑器.
原理.
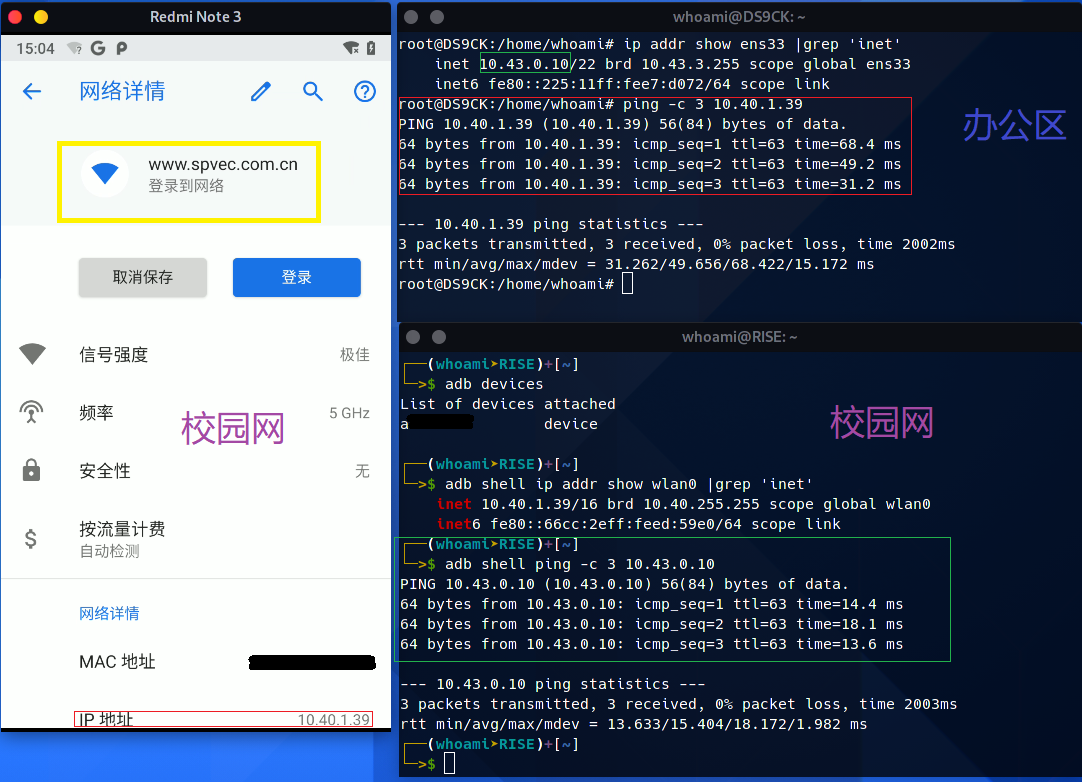
通过第一张图片,可以确定,校园网和那些办公区的计算机有路由,原理很简单我们可以,在那些办公区搭建一台代理服务器,由于办公区可以随便上网,所以我们的服务器自然可以上网,又由于,校园网和办公区之间虽然不在一个网段,但有路由,我们连接上校园网后使用自己的代理服务器就可以直接绕过校园网认证,普通的VPN,显然是首选,但它并不那么灵活,且功能不多,所以只介绍Openvpn和Xray实现具有各种各样功能的代理超集.
由于如果直接写出所有配置文件,本博文,将非常庞大,这里将使用模块法,生成各模块配置,完整的配置见GITHUB,
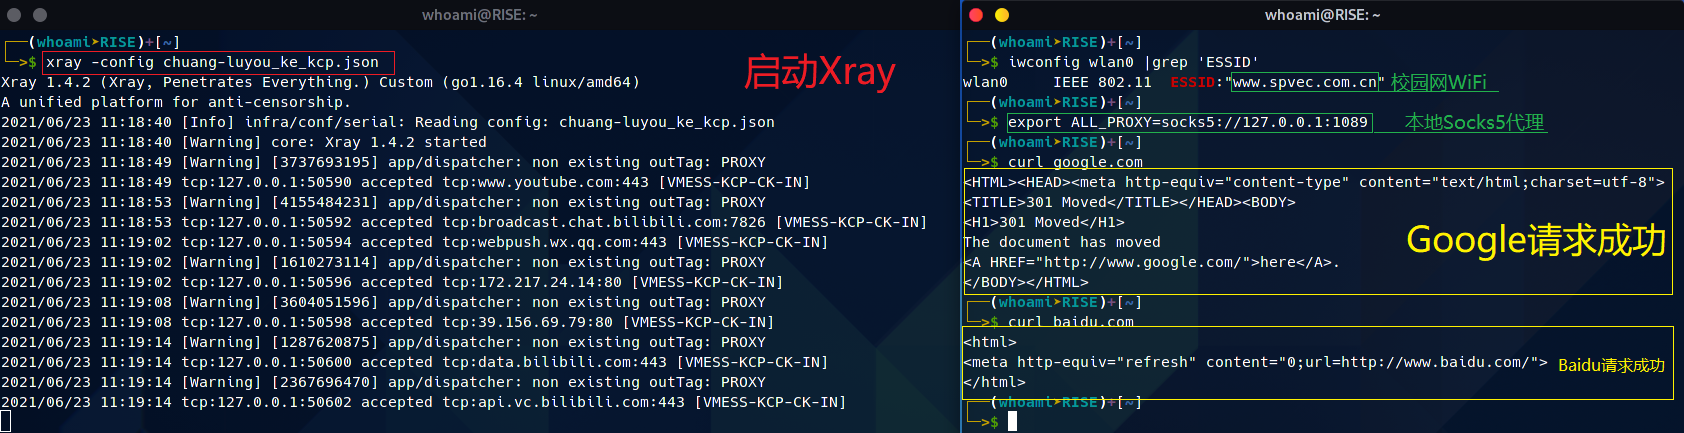
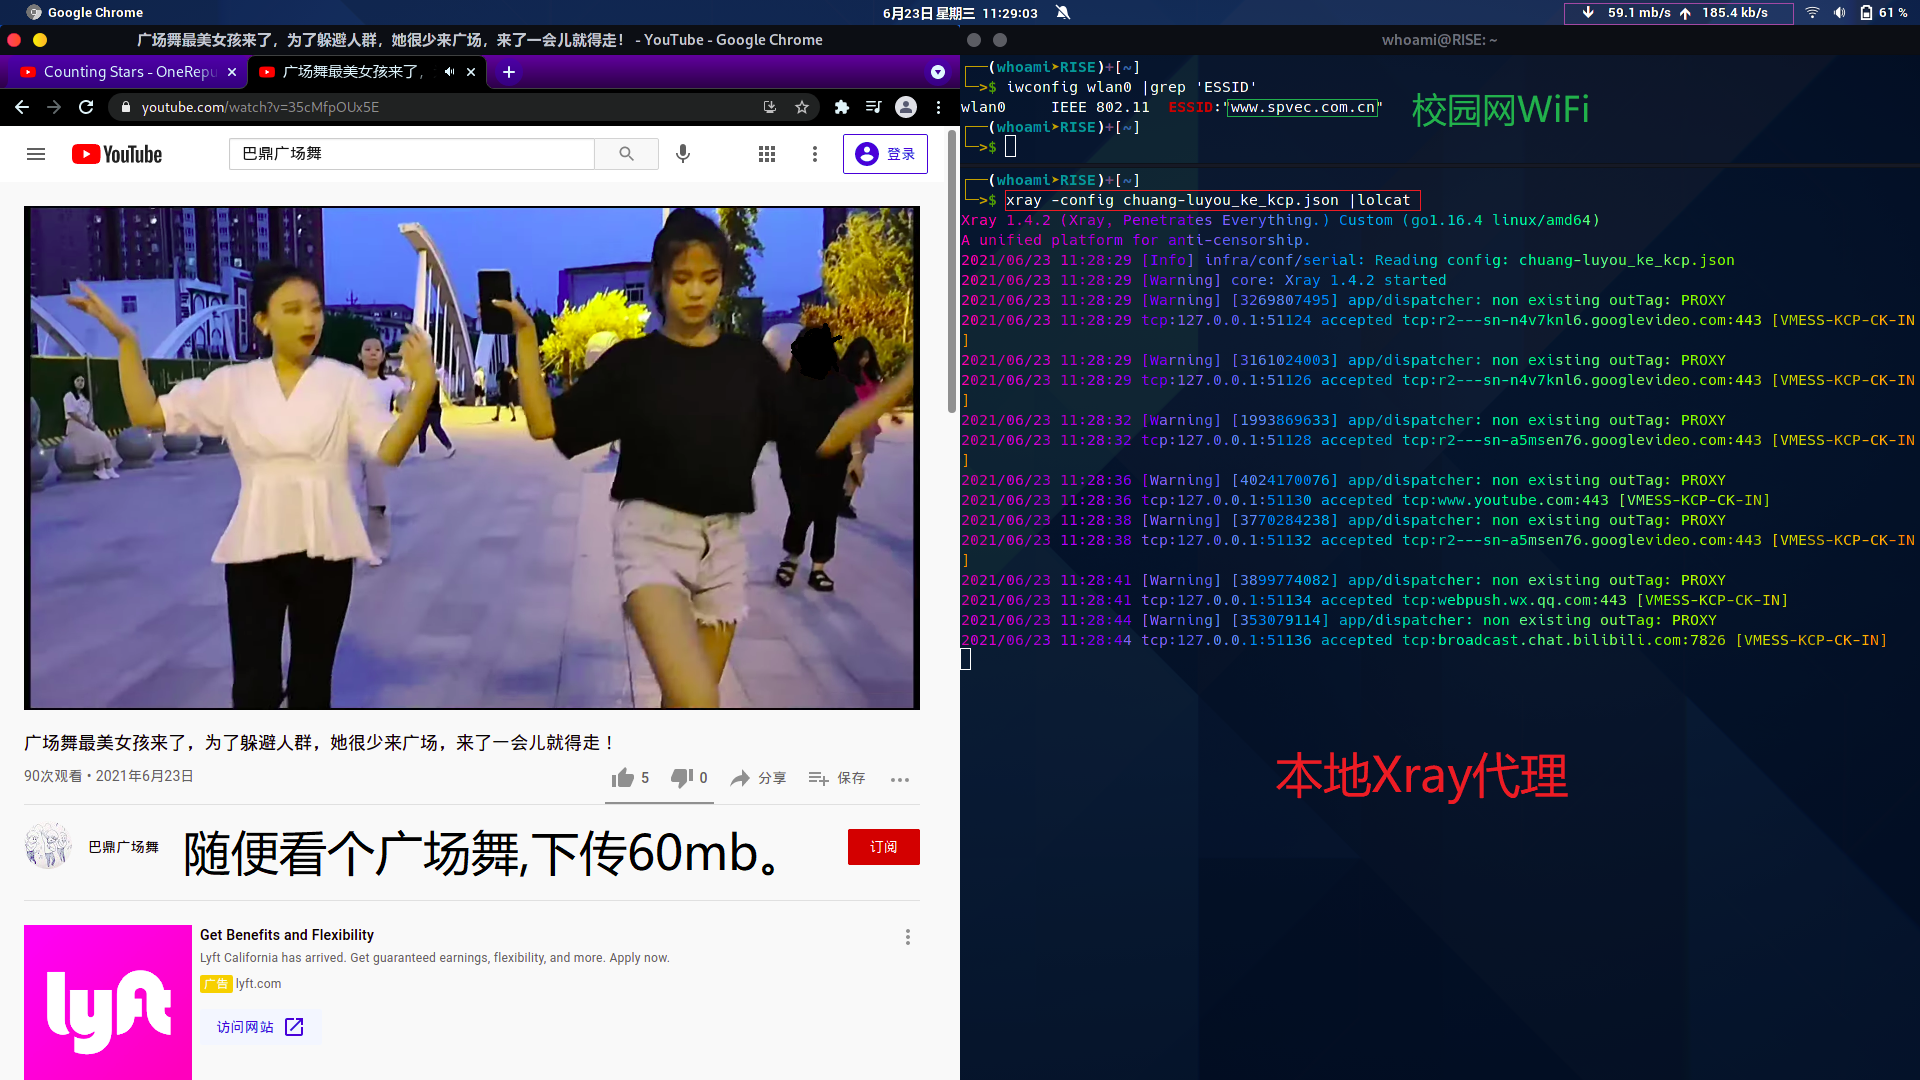
方案0通过Xray代理法,绕过验证(首选,灵活的非常).
第0步.
🔧装好Linux系统,本文所使用的服务器系统Debian9.9.
🔧装好Xray.
cat << EOF > /etc/apt/source/source.list               #配置软件源;
    deb https://mirrors.tuna.tsinghua.edu.cn/debian/ buster main contrib non-free
    #deb-src https://mirrors.tuna.tsinghua.edu.cn/debian/ buster main contrib non-free
    deb https://mirrors.tuna.tsinghua.edu.cn/debian/ buster-updates main contrib non-free
    #deb-src https://mirrors.tuna.tsinghua.edu.cn/debian/ buster-updates main contrib non-free
    deb https://mirrors.tuna.tsinghua.edu.cn/debian/ buster-backports main contrib non-free
    #deb-src https://mirrors.tuna.tsinghua.edu.cn/debian/ buster-backports main contrib non-free
    deb https://mirrors.tuna.tsinghua.edu.cn/debian-security buster/updates main contrib non-free
    #deb-src https://mirrors.tuna.tsinghua.edu.cn/debian-security buster/updates main contrib non-free
EOF
apt-get update                  #建立软件包缓存;
apt-get install git wget        #安装基本工具;

wget 'https://mirrors.ustc.edu.cn/golang/go1.16.5.linux-amd64.tar.gz'   #下载go;
tar -xvf golang*gz -C /usr/local/                                       #解包;
echo 'export PATH="$PATH:/usr/local/go/bin"' > /etc/profile.d/go.sh     #设置go环境变量(此处根据实际情况);

export GOPROXY=https://goproxy.io,direct                                #配置GOPROXY环境变量;
export GOPRIVATE=git.mycompany.com,github.com/my/private                #还可以设置不走proxy 的私有仓库或组,多个用逗号相隔(可选).

git clone https://github.com/XTLS/Xray-core.git                         #克隆xray存储库;
go build -o xray -trimpath -ldflags "-s -w -buildid=" ./main            #编译xray;
ln -sf `pwd`/xray /usr/local/bin #建立xray软链,添加到环境变量;方法1低级.
🔧VMESS+TCP方式绕过校园网验证.
这种方法绝对可以绕过来自XXX职业技术学院的校园网登录认证,技术要求低,安全性一般,但用于校园网足矣!
👉服务器端配置.
{
    //日志配置;
    "log": {
        "access": "/home/log/access.log",
        "error": "/home/log/error.log",
        "loglevel": "warning"
    },
    //入站配置;
    "inbounds": [
        {
            "port": 18099,                                  //监听端口;
            "listen": "0.0.0.0",                            //监听来自所有局域网的连接;
            "protocol": "vmess",                            //协议;
            "settings": {
                "clients": [
                    {
                        "id": "",                           //A,用户UUID;
                        "alterId": 0,                       //额外ID;
                        "level": 0,                         //用户等级;
                        "email": "AAAAA.com"                //A,用户标识;
                    },
                    {
                        "id": "",                           //B,用户UUID;
                        "alterId": 0,                       //B,额外ID;
                        "level": 0,                         //用户等级;
                        "email": "BBBBB.com"                //B,用户标识;
                    }
                ]
            },
            "streamSettings": {
                "network": "tcp",                           //传输方式TCP;
                "security": "auto"                          //加密方式,自动;
            },
            "tag": "VMESS-TCP-CK-IN"                        //入站标签;
        }
    ],
    //出站配置;
    "outbounds": [
        {
            "protocol": "freedom",
            "tag": "direct"
        },
        {
            "protocol": "blackhole",
            "tag": "block"
        }
    ]
}方法2中级.
🔧VMESS+MKCP+流量伪装方式绕过校园网验证.
MKCP使用UDP来模拟TCP连接.MKCP牺牲带宽来降低延迟.传输同样的内容,MKCP 一般比TCP消耗更多的流量,你的流量不仅可以加密,甚至可以伪装成SRTP 数据包,(会被识别为视频通话数据)伪装成UTP数据包,(会被识别为BT下载数据)伪装成微信视频通话的数据包.伪装成DTLS 1.2数据包,伪装成WireGuard数据包.(并不是真正的WireGuard 协议)
👉服务端配置.
{
"log": {
    "access": "/home/log/xray-kcp/access.log",
    "error": "/home/log/xray-kcp/error.log",
    "loglevel": "warning"
},
"inbounds": [
    {
        "port": ,                   //服务器监听端口;
        "listen": "0.0.0.0",        //监听地址,0.0.0.0,代表允许任何入站;
        "protocol": "vmess",
        "settings": {
            "clients": [
                {
                    "id": "",       //主ID;
                    "alterId": 0       //额外ID;
                }
            ]
        },
        "streamSettings": {
            "network": "kcp",
            "security": "auto",           //加密方式;
            "kcpSettings": {
                "mtu": 1350,              //最大传输单元;
                "tti": 20,                //传输时间间隔,MS;
                "uplinkCapacity": 10,      //上行链路容量,MB/S;
                "downlinkCapacity": 20,   //下行链路容量,MB/S;
                "congestion": false,      //拥塞控制;
                "readBufferSize": 2,      //单个连接的读缓冲区大小,MB;
                "writeBufferSize": 2,     //单个连接写入缓冲区大仙,MB;
                "header": {
                    "type": "none"          //伪装形式;
                    //"none"  默认值,不进行伪装,发送的数据是没有特征的数据包.
                    //"srtp" 伪装成SRTP数据包,会被识别为视频通话数据.
                    //"utp"  伪装成 uTP 数据包,会被识别为 BT 下载数据.
                    //"wechat-video" 伪装成微信视频通话的数据包.
                    //"dtls" 伪装成DTLS1.2数据包.
                    //"wireguard" 伪装成WireGuard数据包.(并不是真正的WireGuard协议)

                }
            }
        },
        "tag": "VMESS-KCP-CK-IN"
    }
],
"mux": {
    "enabled": false,
    "concurrency": 8
},
    "outbounds": [
        {
            "protocol": "freedom",
            "tag": "direct"
        },
        {
            "protocol": "blackhole",
            "tag": "block"
        }
    ]
}方法3至尊级.
🔧VMESS+TCP+SDWAN+链式代理方式绕过校园网验证.
OK,前面的那些配置,没什么技术性含量,简直弱智接下来将结合SDWAN技术,搭建代理链,我们的流量将从学校直接中转到自己家,由于家里网络的优质性,我们可以在家里再次中转流量到自由的地方,并配置好路由,至此你的所有行为切就像自己在家上网一样,通过SDWAN技术,将你经由校园网的流量,全部转发到自己家,这项技术主要用于对抗学校的防火墙,阻止你看一些娱乐性节目,以及匿名身份,同时通过2级代理服务器的路由配置,将不同的流量转发到,2级代理服务器出站,以及自由的地方
!!注意!!,配置多级代理链,如果需要配置路由,请放在倒数第2跳,也就是连接国外服务器那一跳;
关于匿名,使用更多的代理,理论上可以达到更高的匿名,但这往往取决与最弱的那一环.
如需高匿,请考虑更成熟的高匿名方案.
👉1级代理配置.
{
"log": {
    "loglevel": "warning"
},
//1级代理服务器入站;
"inbounds": [
    {
        "listen": "0.0.0.0",            //此处0.0.0.0代表允许任何入站;
        "port": ,                       //监听端口;
        "protocol": "vmess",            //协议VMESS;
        "settings": {
            "clients": [
                {
                    "id": "",           //用户UUID;
                    "alterId": 0,       //用户额外ID;
                    "level": 0,         //用户等级;
                    "email": ""         //用户身份标识;
                }
            ]
        },
        //传输方式TCP;
        "streamSettings": {
            "network": "tcp",
            "security": "auto"          //加密方式自动;
        },
        "tag": "Vmess-CK-IN"            //出站标签;
    }
],
//2级代理服务器出站;
"outbounds": [
    {
        //协议VMESS;
        "protocol" : "vmess",
        "settings" : {
            "vnext" : [
                {
                    "users" : [
                        {
                            "id" : "",                  //2级代理服务器UUID;
                            "alterId": 0,               //2级代理服务器额外ID;
                            "level": 0,                 //2级代理服务器用户等级;
                            "email": ""                 //2级代理服务器用户标识;
                        }
                    ],
                    "address" : "",                     //2级代理服务器IP/域名;
                    "port" :                            //2级代理服务器端口;
                }
            ]
        },
        "streamSettings": {
            "network": "tcp",
            "security": "none"
        },
            "tag": "Vmess-Home-IN"
        }
    ]
}👉2级代理服务器配置.
{
"log": {
    "loglevel": "warning"
},
//1级服务器出站流量,入站;
"inbounds": [
    {
        "port": ,                                       //2级服务器监听端口;
        "listen": "0.0.0.0",                            //2级代理监听ip;
        "protocol": "vmess",                            //协议,VMESS;
        "settings": {
            "clients": [
                {
                    "id": "",                           //2级代理服务器UUID;
                    "alterId": 0,                       //2级代理服务器额外ID;
                    "level": 0,                         //2级代理服务器用户等级;
                    "email": ""                         //2级代理服务器用户标识;
                }
            ]
        },
        //传输方式TCP;
        "streamSettings": {
            "network": "tcp",
            "security": "none"
        },
        "tag": "Vmess-Home-IN"                          //出站标签;
    }
],
//MUX配置;
"mux": {
    "enabled": false,
    "concurrency": 8
},
//dns配置;
"dns": {
    "servers": [
        {
            "address": "8.8.8.8",
            "address": "1.1.1.1",
            "address": "8.8.4.4",
            "domains": [
                "geosite:geolocation-!cn"
            ]
        },
        {
            "address": "223.6.6.6",
            "domains": [
                "geosite:cn"
            ],
            "expectIPs": [
                "geoip:cn"
            ]
        },
        {
            "address": "223.5.5.5",
            "address": "119.29.29.29",
            "address": "114.114.114.114",
            "address": "114.114.115.115",
            "address": "180.76.76.76",
            "address": "1.2.4.8",
            "address": "182.254.118.118",
            "address": "210.2.4.8",
            "domains": [
                "geosite:cn"
            ]
        },
        "localhost"
    ]
},
//出站配置(此处的出站,就是3级代理服务器配置);
"outbounds": [
    {
        //协议;
        "protocol": "vmess",
        "settings": {
            "vnext": [
                {
                    "address": "",              //3级代理服务器域名;
                    "port": 443,                //3级代理服务器端口,此处为443,证明这是~你懂的;
                    "users": [
                        {
                            "id": "",               //3级代理服务器用户UUID;
                            "security": "none",     //加密方式(不加密)
                            "level": 0              //用户等级;
                        }
                    ]
                }
            ]
        },
        //传输方式;
        "streamSettings": {
            "network": "tcp",
            "security": "tls",
            "tlsSettings": {
                "serverName": ""                    //3级代理服务器域名;
            },
            "tcpSettings": {
                "header": {
                    "type": "http",
                    "request": {
                        "path": [
                            "/vmesstcp"
                        ]
                    }
                }
            }
        },
        "tag": "PROXY"
    },
    {
        "protocol": "freedom",
        "sendThrough": "0.0.0.0",
        "settings": {
            "domainStrategy": "AsIs",
            "redirect": ":0"
        },
        "streamSettings": {
        },
        "tag": "DIRECT"
    },
    {
        "protocol": "blackhole",
        "sendThrough": "0.0.0.0",
        "settings": {
            "response": {
                "type": "none"
            }
        },
        "streamSettings": {
        },
        "tag": "BLACKHOLE"
    }
],
//路由配置(此处的路由,为2级代理服务的路由,因为2级服务器相当与流量中转);
"routing": {
    "domainStrategy": "AsIs",
    "rules": [
        {
            "type": "field",
            "ip": [
                "geoip:private"
            ],
            "outboundTag": "DIRECT"
        },
        {
            "type": "field",
            "ip": [
                "geoip:cn"
            ],
            "outboundTag": "DIRECT"
        },
        {
            "type": "field",
            "domain": [
                "geosite:cn"
            ],
            "outboundTag": "DIRECT"
        },
        {
            //大陆域名,IP,丢弃,(就是直连)
            "type": "field",
            "domain": [
                "geosite:cn",
                "geoip:private"
            ],
            "outboundTag": "DIRECT"
        },
            {
                //大陆外域名,走代理;
                "type": "field",
                "domain": [
                    "geosite:geolocation-!cn"
                ],
                "outboundTag": "PROXY"
            }
        ]
    }
}👉3级代理服务器配置.
这里给出Xray的配置超集(此配置,包含所有的协议类型).
//日志配置;
{
"log": {
    "loglevel": "warning"
},
//入站配置;
"inbounds": [
    {
        "port": 443,                                        //端口443;
        "protocol": "vless",                                //协议VLESS;
        "settings": {
            "clients": [
                {
                    "id": "",                               //用户主ID;
                    "flow": "xtls-rprx-direct",
                    "level": 0,                             //用户等级;
                    "email": "xxx.com"                      //用户标识;
                }
            ],
            "decryption": "none",                           //服务端认可的用户;(目前只能填none);
            //回落分流配置集;
            "fallbacks": [
                {
                    "dest": 1310,                           //TLS解密后TCP流量的去向(协议回落);
                    "xver": 1                               //传递请求的真实来源IP和端口;
                },
                {
                    "path": "/websocket",                   //VLess+Websocket+TLS协议回落;
                    "dest": 1234,                           //协议回落地址;
                    "xver": 1                               //传递请求的真实来源IP和端口;
                },
                {
                    "path": "/vmesstcp",                    //Vmess+Tcp+TLS,协议回落;
                    "dest": 2345,                           //协议回落地址;
                    "xver": 1                               //传递请求的真实来源IP和端口;
                },
                {
                    "path": "/vmessws",                     //Vmess+Websocket+TLS,协议回落;
                    "dest": 3456,                           //协议回落地址;
                    "xver": 1                               //传递请求的真实来源IP和端口;
                }
            ]
        },
         //底层传输协议配置(XTLS)
        "streamSettings": {
            "network": "tcp",
            "security": "xtls",
            "xtlsSettings": {
                "alpn": [
                    "http/1.1"
                ],
                "certificates": [
                    {
                        "certificateFile": "",              //SSL证书公钥;
                        "keyFile": ""                       //SSL证书私钥;
                    }
                ]
            }
        }
    },
    //Trojan协议配置;
    {
        "port": 1310,
        "listen": "127.0.0.1",
        "protocol": "trojan",
        "settings": {
            "clients": [
                {
                    "password": "",
                    "level": 0,
                    "email": ""
                }
            ],
            "fallbacks": [
                {
                    "dest": 80
                }
            ]
        },
        "streamSettings": {
            "network": "tcp",
            "security": "none",
            "tcpSettings": {
                "acceptProxyProtocol": true
            }
        }
    },
    //Vless+Websocket+Tls协议配置;
    {
        "port": 1234,
        "listen": "127.0.0.1",
        "protocol": "vless",
        "settings": {
            "clients": [
                {
                    "id": "",
                    "level": 0,
                    "email": ""
                }
            ],
            "decryption": "none"
        },
        "streamSettings": {
            "network": "ws",
            "security": "none",
            "wsSettings": {
                "acceptProxyProtocol": true,
                "path": "/websocket"
            }
        }
    },
    //Vmess+Tcp+Tls协议配置;
    {
        "port": 2345,
        "listen": "127.0.0.1",
        "protocol": "vmess",
        "settings": {
            "clients": [
                {
                    "id": "",
                    "level": 0,
                    "email": ""
                }
            ]
        },
        "streamSettings": {
            "network": "tcp",
            "security": "none",
            "tcpSettings": {
                "acceptProxyProtocol": true,
                "header": {
                    "type": "http",
                    "request": {
                        "path": [
                            "/vmesstcp"
                        ]
                    }
                }
            }
        }
    },
    //Vmess+Websocket+Tls协议配置;
    {
        "port": 3456,
        "listen": "127.0.0.1",
        "protocol": "vmess",
        "settings": {
            "clients": [
                {
                    "id": "",
                    "level": 0,
                    "email": ""
                }
            ]
        },
        "streamSettings": {
            "network": "ws",
            "security": "none",
            "wsSettings": {
                "acceptProxyProtocol": true,
                "path": "/vmessws"
            }
        }
    }
],
//3级代理,出站协议,可以用来向任意网络发送(正常的)TCP或UDP数据;
"outbounds": [
    {
        "protocol": "freedom"
        }
    ]
}客户端配置.
如果每个服务对应写一个配置文件,此文章将变的很长,所以这里采用模块法;
👉日志配置.
"log": {
    "loglevel": "warning"
},👉本地入站配置.
    "inbounds": [
    {
        本地socks代理配置;
        "listen": "127.0.0.1",              //本地socks监听地址;
        "port": "1089",                     //本地socks监听端口;
        "protocol": "socks",
        "settings": {
            "auth": "noauth",
            "udp": true,                    //UDP代理使能;
            "ip": "127.0.0.1"
        }
    },
    {
        //本地http代理配置;
        "listen": "127.0.0.1",              //本地http监听地址;
        "port": "8889",                     //本地http监听端口;
        "protocol": "http"
    }
],👉VMESS+TCP出站配置.
    "outbounds": [
    {
        //协议配置;
        "protocol": "vmess",
        "settings": {
            "vnext": [
                {
                    "address": "",              //服务器IP,或域名;
                    "port": ,                   //服务器端口;
                    "users": [
                        {
                            "id": "",           //用户UUID;
                            "alterId": 0,       //额外ID;
                            "level": 0,         //用户等级;
                            "email": ""         //用户身份标识;
                        }
                    ]
                }
            ]
        },
        //传输配置;
        "streamSettings": {
            "network": "tcp",                   //传输方式TCP;
            "security": "auto"                  //加密方法(自动)
        },
        "tag": "proxy"
    },
    {
        "protocol": "freedom",
        "tag": "direct"
    }
]👉VMESS+MKCP出站配置.
  "outbounds": [
    {
        //协议配置;
        "protocol": "vmess",
        "settings": {
            "vnext": [
                {
                    "address": "",                          //服务器IP或域名;
                    "port": ,                          //服务器端口;
                    //用户配置;
                    "users": [
                        {
                            "id": "",                       //用户UUID;
                            "alterId": 0,                   //额外ID;
                            "level": 0,                     //用户等级;
                            "email": "test.com"             //用户标识;
                        }
                    ]
                }
            ]
        },
        //传输方式配置;
        "streamSettings": {
            "network": "kcp",
            "security": "auto",                             //加密方式(自动)
            "kcpSettings": {
                "mtu": 1350,                                //最大传输单元;
                "tti": 15,                                  //传输时间间隔,MB/S;
                "uplinkCapacity": 300,                      //上行链路容量,MB/S;
                "downlinkCapacity": 500,                    //下行链路容量,MB/S;
                "congestion": true,                         //拥塞控制使能;
                "readBufferSize": 3,                        //单个连接的读缓冲区大小,MB;
                "writeBufferSize": 3,                       //单个连接写入缓冲区大小,MB;
                "header": {
                    "type": "none"                          //伪装类型,none不伪装;
                }
            }
        },
        "tag": "VMESS-KCP-CK-IN"                            //出站标签;
    },
    {
        "protocol": "freedom",
        "tag": "direct"
    },
    {
        "protocol": "freedom",
        "sendThrough": "0.0.0.0",
        "settings": {
            "domainStrategy": "AsIs",
            "redirect": ":0"
        },
        "streamSettings": {
        },
        "tag": "DIRECT"
    },
    {
        "protocol": "blackhole",
        "sendThrough": "0.0.0.0",
        "settings": {
            "response": {
                "type": "none"
            }
        },
        "streamSettings": {
        },
        "tag": "BLACKHOLE"
    }
],👉DNS配置.
    "dns": {
    "servers": [
        {
            //国外域名,用国外DNS查询;
            "address": "8.8.8.8",
            "address": "1.1.1.1",
            "address": "8.8.4.4",
            "domains": [
                "geosite:geolocation-!cn"
            ]
        },
        {
            //大陆域名IP,首选阿里DNS查询;
            "address": "223.6.6.6",
            "domains": [
                "geosite:cn"
            ],
            "expectIPs": [
                "geoip:cn"
            ]
        },
        {
            //大陆域名IP,备用DNS查询;
            "address": "223.5.5.5",
            "address": "119.29.29.29",
            "address": "114.114.114.114",
            "address": "114.114.115.115",
            "address": "180.76.76.76",
            "address": "1.2.4.8",
            "address": "182.254.118.118",
            "address": "210.2.4.8",
            "domains": [
                "geosite:cn"
            ]
        },
        //如若,以上DNS都失效,使用本地DNS查询;
        "localhost"
    ]
},👉MUX,TCP多路复用,配置.
    "mux": {
    "enabled": true,            //使能与否;
    "concurrency": 8            //并发个数;
},👉路由配置.
    "routing": {
    "domainStrategy": "AsIs",
    "rules": [
        {
            //广告域名,丢进黑洞;
            "type": "field",
            "domain": [
                "geosite:category-ads-all"
            ],
            "outboundTag": "BLACKHOLE"
        },
        {
            "type": "field",
            "domain": [
                //丢进黑洞的网站;
                //主流色情网站;
                "pornhub.com",
                "ponurl.com",
                "redtube.com",
                "xnxx.com",
                "qingse.one",
                "9aabs.club",
                "uux68.com",
                "javhd.com",
                "22dy.me",
                "theporndude.com",
                "141jj.com",
                "porndude.p67z.com",
                "91porn.com",
                "theporndude.com",
                "9ast.club",
                "mangotporn.com",
                "seju8.com",
                "thepornmap.com",
                "mrporngeek.com",
                "fanqianglu.com",
                "whichav.video",
                "pornsitesnow.com",
                "pornsites.xxx",
                "hotporn.today",
                "seju.app",
                "kokqq.com",
                "thepornbest.com",
                "xhamster.com",
                "redhdtube.xxx",
                "redtube.zone",
                "redtubepornhd.com",
                "xbx.mobi",
                "thisav.com",
                "fuqvids.com",
                "relax-porn.com",
                "hostiex.com",
                "fullporn.online",
                "red-tube.video",
                //丢进黑洞的网站;
                //主流测速网站;
                "speedtest.cn",
                "wangsuceshi.bmcx.com",
                "pc286.com",
                "wangsu123.cn",
                "btguard.com",
                "teleport.to",
                "linkwan.com",
                "loadimpact.com",
                "bandwidthplace.com/",
                "ookla.com",
                "broadbandspeedchecker.co.uk",
                "kdcsw.com",
                "speedtest.net",
                "fast.com",
                "netspotapp.com"
            ],
            "outboundTag": "BLACKHOLE"
        },
        {
            "type": "field",
            "ip": [
                //丢进黑洞的IP;
                "103.39.76.66",
                "108.160.165.8",
                "66.254.114.41",
                "157.240.7.5",
                "172.67.214.183",
                "104.21.23.247",
                "45.114.11.238",
                "162.125.2.6",
                "69.171.229.73",
                "67.228.102.32",
                "108.160.170.45"
            ],
            "outboundTag": "BLACKHOLE"
        },
        {
            //大陆外域名,走代理;
            "type": "field",
            "domain": [
                "geosite:geolocation-!cn"
            ],
            "outboundTag": "PROXY"
        },
        {
            //大陆IP域名走代理,因为,我们所有的流量都必须走服务器,;
            "type": "field",
            "domain": [
                "geosite:cn",
                "geoip:private"
            ],
            "outboundTag": "PROXY"
        },
        {
            //大陆域名IP,局域网IP,丢弃,(就是走直连)
            "type": "field",
            "ip": [
                "geoip:cn",
                "geoip:private"
            ],
            "outboundTag": "DIRECT"
        }
    ]
}Xray最终效果.
Openvpn方案.
相比与Xray,Openvpn的配置相对简单,但功能少.
当然它们俩是可以嵌在一起使用,或许这就是爱情吧!
- 🔧服务器系统Debian9.9.
- 🔧客户端系统Arch Linux.
证书配置.
第0步,(安装…)
apt-get update                          #建立软件包缓存;
apt-get -y install openvpn easy-rsa        #安装Openvpn,和easersa制作证书;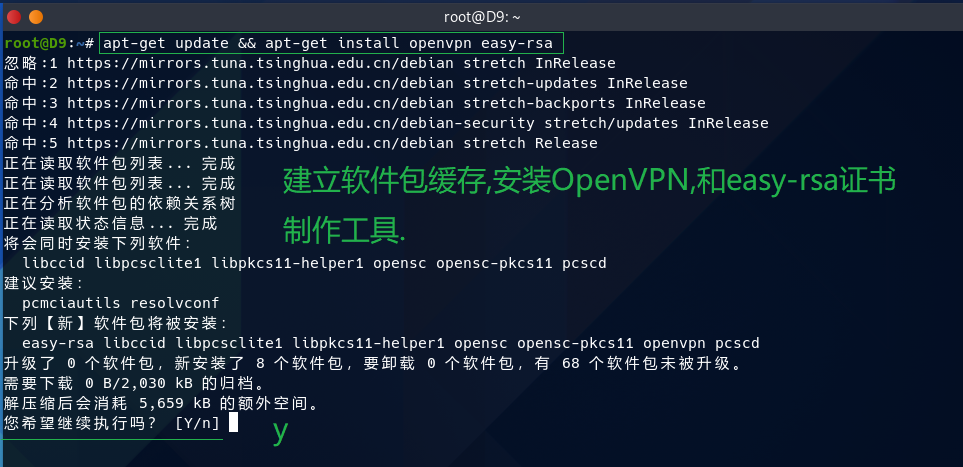
第1步,(配置模板文件).
gunzip -c /usr/share/doc/openvpn/examples/sample-config-files/server.conf.gz > /etc/openvpn/server.conf   #解压模板文件,重定向到/etc/openvpn/server.conf;
cp -vr /usr/share/easy-rsa /tmp/            #复制证书制作工具,到临时目录,制作证书;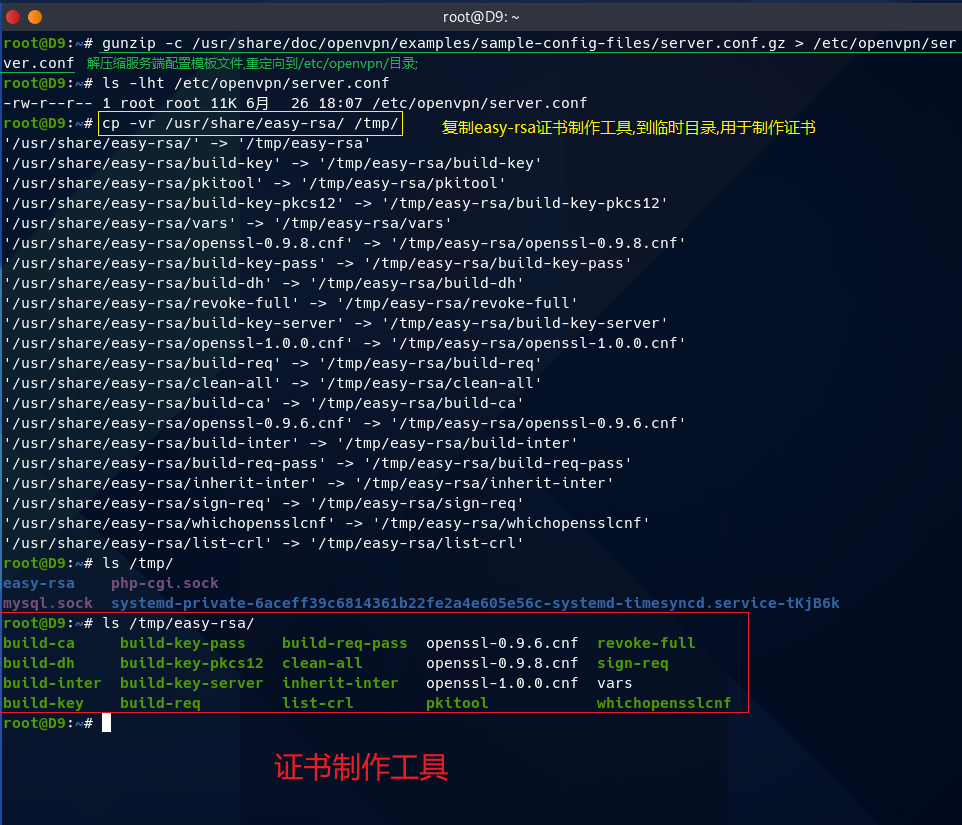
第2步,(配置vars文件,并生成keys目录)
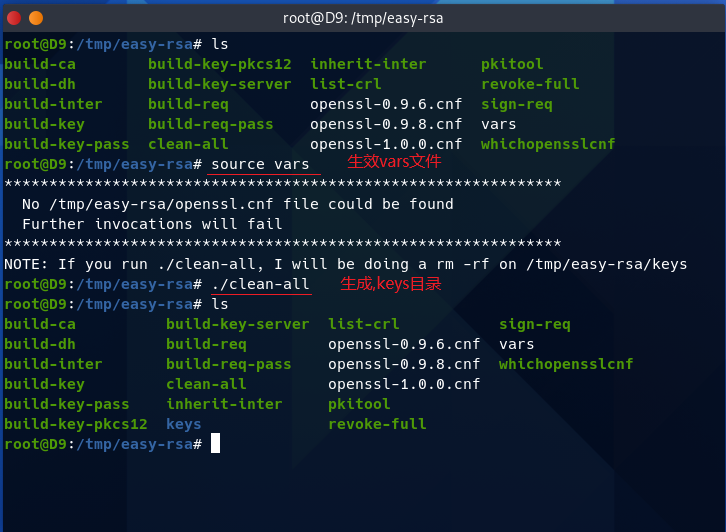
cd /tmp/easy-rsa
vim vars
export KEY_COUNTRY="CN"                 #国家;(随便写)
export KEY_PROVINCE="ShangHai"          #省份;(随便写)
export KEY_CITY="YangPu"                #城市;(随便写)
export KEY_ORG="Fort-Funston"           #组织机构;(随便写)
export KEY_EMAIL="loveme@gmail.com"     #邮箱;(随便写)
export KEY_OU="Happy"                   #单位;(随便写)

source vars                             #生效vars文件;
./clean-all                             #生成keys目录(用于存放证书,私钥等);
第3步,(生成根证书和密钥)
mv -v openssl-1.0.0.cnf openssl.cnf
./build-ca
一路按回车.....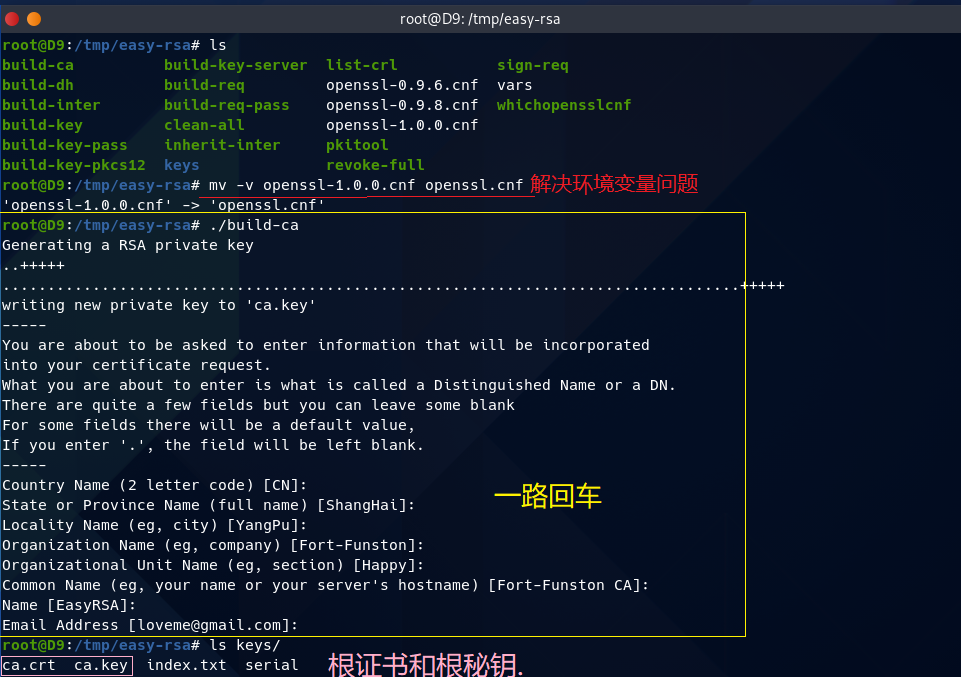
第4步,(生成服务器端证书和密钥)
./build-key-server 证书名 #配置服务器端证书和密钥;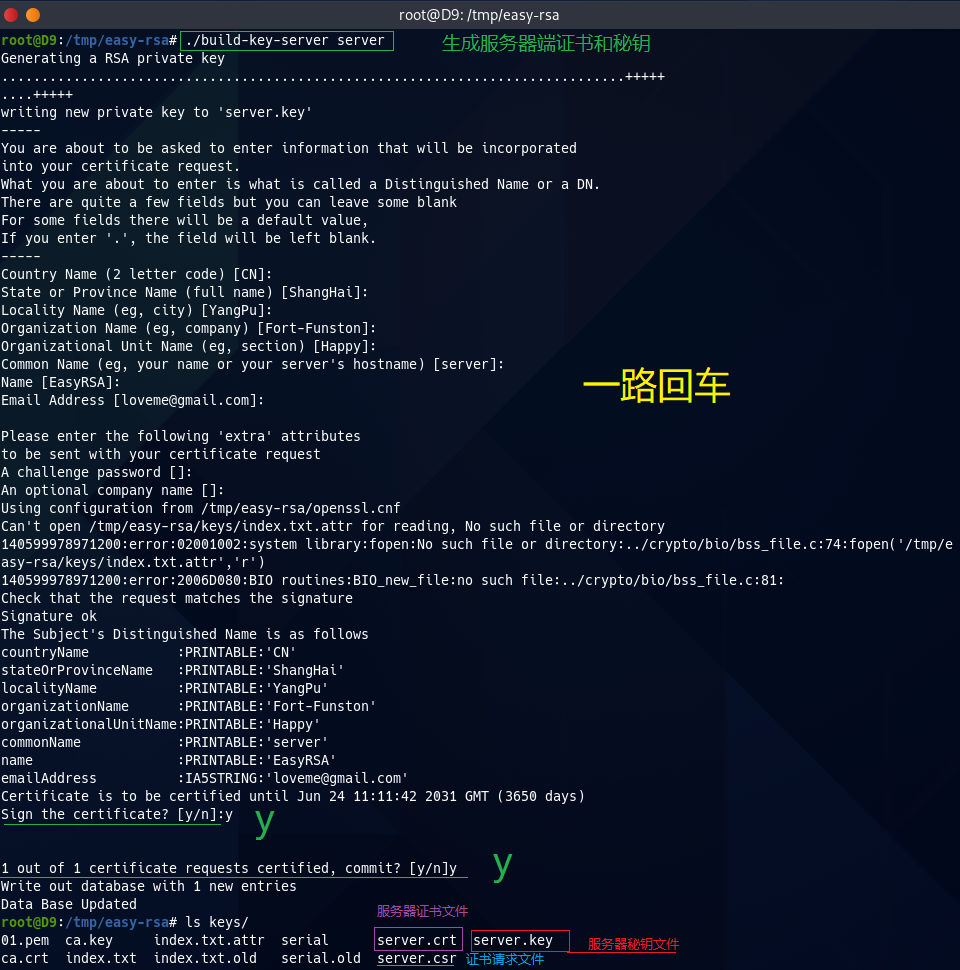
第5步,(生成客户端证书和密钥)
./build-key 证书名称 #配置客户端证书和密钥;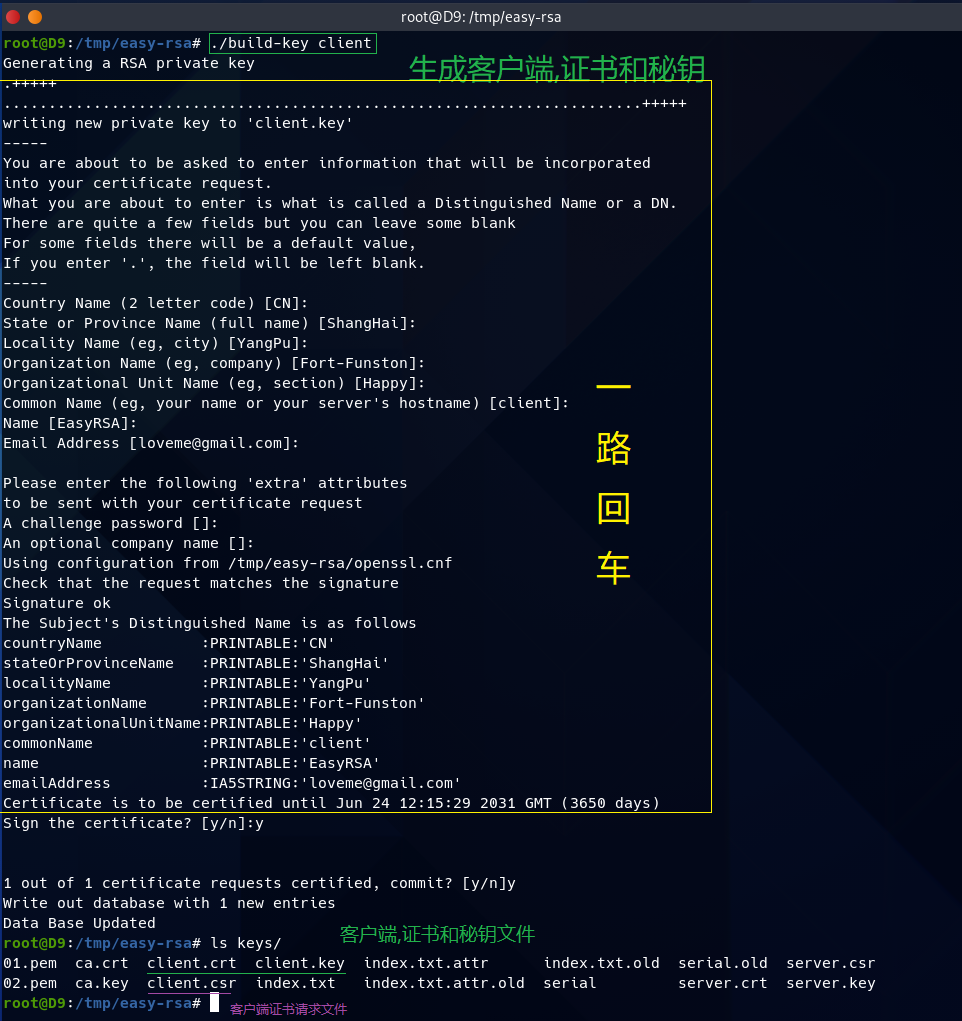
第6步,(生成密钥交换文件)
./build-dh #生成密钥交换文件;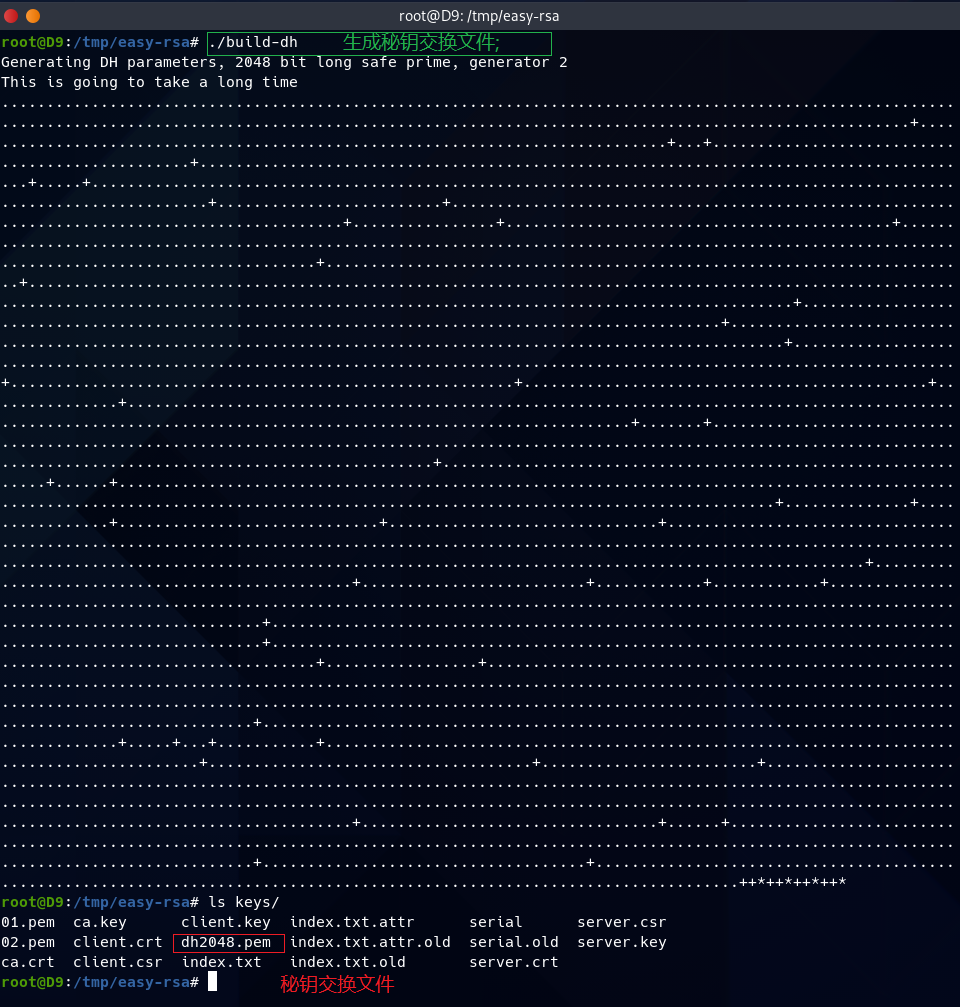
第7步,(生成拒绝服务攻击证书文件)
openvpn --genkey --secret ta.key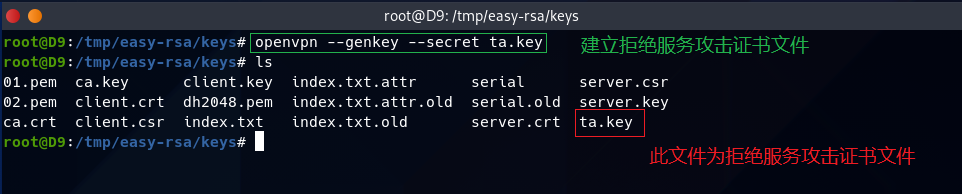
服务器端配置.
mkdir /etc/openvpn/keys                         #此keys目录用于存放证书等;
cp -v {ca.crt,server.crt,server.key,dh2048.pem,ta.key} /etc/openvpn/keys/      #复制证书密钥等;

#配置Openvpn服务端;
cat << EOF > /etc/openvpn/server.conf
    port 1194
    proto udp
    dev tun
    ca keys/ca.crt                              #CA证书路径;
    cert keys/server.crt                        #服务器证书路径;
    key keys/server.key                         #服务器密钥路径;
    dh keys/dh2048.pem                          #密钥交换文件路径;
    server 10.8.0.0 255.255.255.0               #OpenVPN虚拟网段;
    ifconfig-pool-persist ipp.txt
    push "route 10.8.0.0 255.255.255.0"
    push "route 10.43.0.0 255.255.252.0"        #服务器所处网段;
    push "redirect-gateway def1 bypass-dhcp"
    push "dhcp-option DNS 223.5.5.5"
    push "dhcp-option DNS 180.76.76.76"
    client-to-client
    duplicate-cn
    keepalive 10 120
    tls-auth keys/ta.key 0
    cipher AES-256-GCM                          #加密方式;
    comp-lzo
    user nobody
    group nogroup
    persist-key
    persist-tun
    status openvpn-status.log
    verb 3
    explicit-exit-notify 1
EOF
开启IP转发.
echo 'net.ipv4.ip_forward=1' > /etc/sysctl.conf
sysctl -p
配置iptables.
iptables -t nat -A POSTROUTING -s OpenVPN虚拟网段 -o 网络接口 -j SNAT --to 服务器IP启动服务端;
systemctl daemon-reload                     #重新加载所有服务;
systemctl start openvpn.service             #启动openvpn服务;
systemctl status openvpn.service            #查看openvpn服务启动状态;
netstat -lntup |grep 1194                   #查看1194端口;
客户端配置(Arch Linux).
- ✍复制服务器端的ca.crt ta.key client.crt client.key -> /etc/openvpn/client目录下
- ✍这么简单的事情,我就闭嘴了….
安装Openvpn(Arch Linux).
pacman -Syy openvpn #同步软件包,并安装Openvpn;配置Openvpn客户端.
cat << EOF > /etc/openvpn/client/client.ovpn
    client
    dev tun
    proto udp
    remote x.x.x.x xxxx          #服务器ip和端口;
    resolv-retry infinite
    nobind
    user nobody
    group nogroup
    persist-key
    persist-tun
    ca ca.crt
    cert client.crt
    key client.key
    remote-cert-tls server
    tls-auth ta.key 1
    cipher AES-256-GCM           #加密方式;
    comp-lzo
    verb 3
EOF
启动Openvpn.
openvpn --daemon --config /etc/openvpn/client/client.ovpnOpenvpn测试.
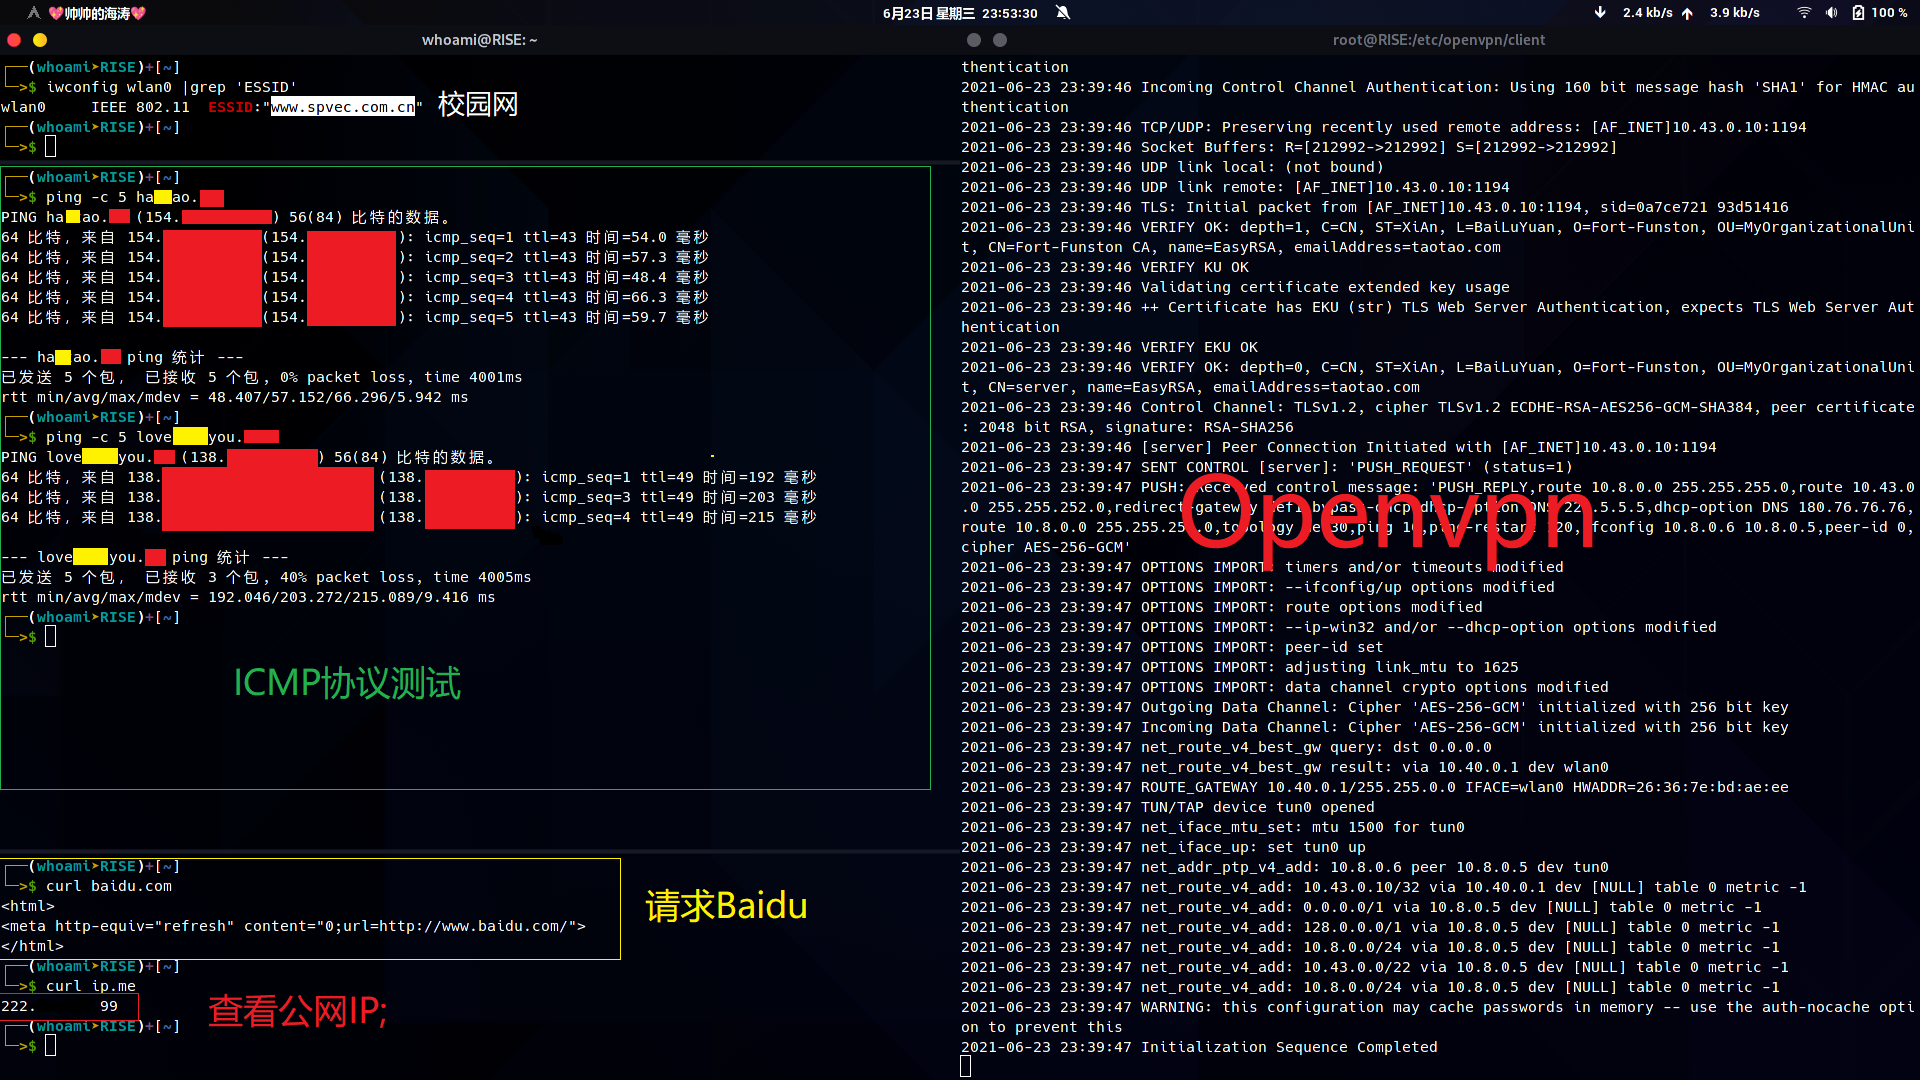
信息不应该被收费.
网络不应该被封锁.
悄悄的我走了,正如我悄悄的来,挥一挥衣袖,带走一片小云彩.